
How to Destroy a Wall In Two Easy Steps by Mark Parlee
How to Destroy a Wall in Two Easy Steps
I was recently called to a home in Grinnell, Iowa, to investigate a water stain on the interior drywall. The stain was a harmless-looking discoloration of the paint at the top of one wall, but it roughly lined up on the exterior with a roof-wall intersection that didn’t have a kick-out flashing. It was easy to guess what was causing the problem. What wasn’t clear was the extent of damage.
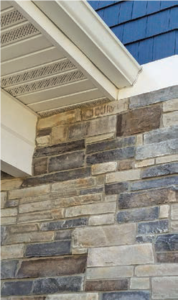
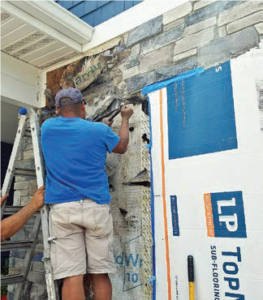
There was little evidence on the outside of the building of a significant problem (1). The exterior cladding consisted of vinyl siding covering the second-story walls, and manufactured stone covering the first-floor walls. Both claddings are incredibly resilient. This particular stone was varicolored with highlights that completely hid any efflorescence (the leaching of minerals onto the surface of masonry) that would have been a sure sign of water problems. But I didn’t need to see damage on the outside of the cladding to know that there could be damage behind it. Installing kick-out flashings poorly—or not installing them at all—is a common mistake that allows bulk water into the wall cavity. There was no question in my mind we had to open up the wall to investigate further.
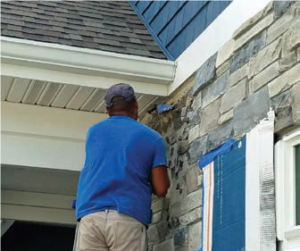
As soon as we started to take apart the wall, we found a good-quality drainage mat over a weather barrier (2). That was a good sign. In theory, this dimpled mat would create a capillary break to interrupt the flow of water through the porous masonry cladding and allow it to flow down through the drainage mat and out the bottom of the wall. Nevertheless, behind these products, the OSB sheathing was rotten (3). This was not too surprising given the lack of a kick out to divert the water. Even with a good drainage plane, the amount of water draining off a roof can overwhelm a drainage system and soak the sheathing.
From the outside of the home, there was little damage evident, certainly nothing that indicated that this single section of wall would eventually require $4,000 to $6,000 in repairs.
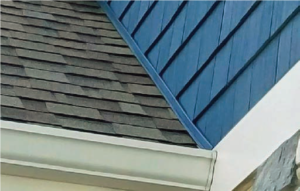
In this case, the bottom channel on the vinyl siding above the roof was acting like a tiny gutter to collect water flowing down the wall and surgically inject it onto the top edge of the frieze board that divided the vinyl and manufactured-stone sections of the wall (4). There was no Z-flashing on this frieze board, either, so chances were high that a significant amount of that water was draining to the back of the frieze and soaking the OSB from above. The drainage mat started below this frieze board, so it wasn’t providing any help.
At this point, everything seemed predictable, and I was still hopeful at first that the damage would be fairly well contained, perhaps to just the area on the opposite side of the water stain. But as it turned out, there’s more to this story than just missing kick-out flashing.
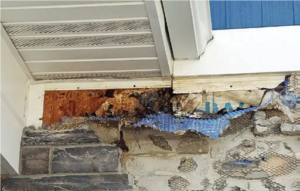
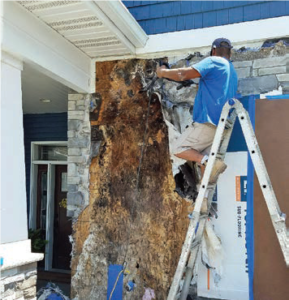
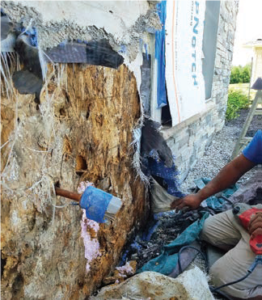
We continued to take the wall apart, stripping the stone back and hoping to come to the end of the rot (5). No such luck. We opened up the entire wall without finding any solid sheathing (6). The worst rot was at the base of the wall (7), illustrating clearly why details matter.
A wonderful drainage mat turns out to be a complete waste of money if you leave out weeps at the base of the wall. There was nothing like that in this wall. By not creating a way for water to drain out the bottom of the drainage mat, the builder succeeded only in creating a larger reservoir (larger than the manufactured stone itself) to hold all the water that drained down the wall. That water then backed up, easily leaking through the overlaps in the drainage mat and weather barrier and soaking the OSB. Moreover, without a kick-out flashing, he succeeded in creating a tremendously large source of water to feed his reservoir.
The repair would not be complicated. We needed to tear out and replace all the rotten sheathing and replace all the same elements of the exterior cladding system. This time, however, we would include the two missing elements: a weep screed at the base of the wall, and a kick-out flashing at the base of the roof-wall intersection. In this case, the kick out would need to be installed behind the vinyl J-bead so any water running down that “mini gutter” would be diverted into the roof gutter.
Mark Parlee, a building-envelope consultant and builder in Urbandale, Iowa, specializes in exterior renovations and envelope solutions.
All photos by Mark Parlee
